Tile Shower Waterproofing Systems Compared: Schluter Kerdi vs LATICRETE Hydro Ban vs Liquid Membranes
The membrane, not the tile keeps a shower dry. Below, we compare sheet membranes, liquid-applied membranes, and foam-board kits, with practical guidance on drains, flood tests, and cure times for long-lasting tile showers in Indiana.
Why waterproofing matters
Tile and grout are water-tolerant, not waterproof. Moisture finds its way through pinholes, hairline cracks, corners, and fastener penetrations, then wicks into cement board, mortar beds, and framing. A proper tile shower uses a continuous, bonded waterproofing membrane that ties walls, pan, curb, niche, and drain into one sealed assembly. With a surface-applied system, water never reaches the substrate, so there’s no saturated mud bed, no capillary wicking, and far fewer chances for mold or efflorescence. In freeze–thaw climates like Terre Haute, limiting water inside the assembly also reduces movement, grout cracking, and premature failure.
What goes wrong without true waterproofing
- Seams and corners leak where the membrane is thin or missing
- Drain connections fail when weep paths clog or the flange isn’t integrated
- Water loads the mortar bed, driving mold odor and loose tiles
- Humidity accumulates behind tile when ventilation is poor and surfaces aren’t sealed
The main system families
Modern showers use one of three surface-applied approaches that keep water out of the substrate.
Sheet membranes (Schluter Kerdi, Hydro Ban Sheet)
- Thinset-bonded sheets with seam banding and preformed corners
- Predictable thickness and inspectable overlaps
- Integrates cleanly with a bonding-flange drain
- Best for standard alcoves, linear drains, and flat, plumb walls
Liquid-applied membranes (Hydro Ban liquid, RedGard, AquaDefense)
- Rolled, brushed, or troweled to a target wet-film thickness; cures into a continuous layer
- Fewer seams; excellent for niches, benches, arches, and irregular layouts
- Verify coverage with a wet-film gauge
- Observe cure windows and flood-test timing
Foam-board systems (Kerdi-Board, Wedi)
- Waterproof foam backer panels for fast, flat, lightweight walls
- Tape/band seams and fastener heads; pair with a compatible bonding-flange drain
- Ideal for large-format tile and quick turnarounds
- Keep planes plumb and co-planar for clean tile layout
Traditional liners (PVC/CPE)
- Liner below a mortar bed with a clamping drain
- Works when pre-slope is correct and weep holes are protected
- Easier to misinstall compared to surface-applied systems
Tip: Whatever you choose, plan drain compatibility, continuous membrane at corners and penetrations, and a documented flood test before any tile goes in.
Side-by-side comparison
| System | Type | Best for | Strengths | Watchouts | Typical materials cost* |
|---|---|---|---|---|---|
| Schluter Kerdi (sheet) | Bonded sheet | Standard alcoves, linear drains | Predictable thickness, visual seam checks, full accessory line | Flat substrate matters; roll seams firmly | ~$400–$900 (kit with drain) |
| Hydro Ban (liquid) | Liquid membrane | Niches, benches, curves | Fewer seams, flexible detailing, cost-effective | Must hit wet mils; observe cure and flood windows | ~$150–$350 (membrane plus corner fabric) |
| Foam boards (Kerdi-Board/Wedi) | Foam plus seam tape | Fast, ultra-flat wall builds | Speed, plumb planes, integrated niches and benches | Precise seam and fastener banding is critical | ~$800–$1,300 (typical wall kit) |
Approximate materials for a 3×5 alcove. Always follow each manufacturer’s cure and flood-test instructions.
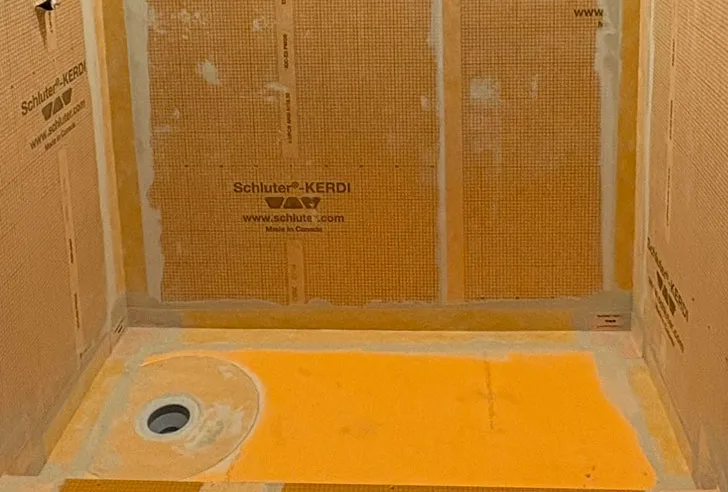
Schluter Kerdi (sheet): where it shines
Kerdi is a bonded sheet membrane that excels when you want predictable thickness, clean overlaps, and a fully integrated drain and accessory lineup. On flat, plumb walls, it delivers a continuous waterproof layer from walls to pan with preformed inside/outside corners, pipe and mixing-valve seals, and bonding-flange or linear drain options. Proper thinset coverage and firm seam rolling create uniform adhesion, while visual seams make inspection and flood-test prep straightforward.
Quick guidance
- Check substrate flatness and plane walls before install; skim or true any low/high spots.
- Use the mortar specified by the manufacturer, key it in, then comb and embed the sheet for full coverage.
- Maintain the required overlap at seams and corners; use preformed corners and seals at penetrations.
- Integrate a bonding-flange or compatible linear drain and keep pan slope at 1/4″ per foot.
- Sequence work to protect the pan (many leave the bottom wall course out until after flood testing).
- Allow the required cure window, then flood test and photo-document the water line before tile.
LATICRETE Hydro Ban (liquid): why pros love it
Liquid waterproofing shines when geometry gets tricky. Niches, benches, arches, and radius details coat cleanly without layering multiple sheets. Applied at the correct wet-film thickness, it cures into a continuous membrane that bridges small cracks, seals penetrations, and simplifies changes of plane. Used with the right drain and proper slope, it delivers a monolithic, tile-ready surface that performs well in cold, damp climates where cure time and humidity control matter.
Hydro Ban installs with a roller, brush, or trowel and relies on measured coverage rather than guesswork. A wet film gauge verifies mil thickness, contrasting coats make holidays and pinholes easy to spot, and fabric reinforcement at corners or seams (when required by the data sheet) ensures durable transitions. Respecting temperature and humidity ranges is key; full cure before a flood test prevents false failures and callbacks.
Quick guidance
- Prepare approved substrates clean, flat, dry, and dust-free; verify slope at 1/4″ per foot toward the drain before coating.
- Apply multiple coats to the specified wet mils using a wet film gauge; run the second coat in a perpendicular direction and use a contrasting color if available to reveal holidays.
- Reinforce corners, changes of plane, cracks, and penetrations per manufacturer instructions (embed fabric where required); seal around valves and pipe sleeves with system gaskets or sealant.
- Observe cure windows based on temperature and RH, provide ventilation or gentle heat as needed, then perform and document the flood test for the full duration before setting tile.
Foam-board systems: speed and flatness
Foam backer panels (Kerdi-Board, Wedi) deliver plumb, flat walls fast because the waterproof core and facing create a tile-ready surface without soaking substrates. Panels are mechanically fastened with screws and washers, then sealed by banding every seam and fastener head. This approach is ideal for large-format tile where plane tolerance matters (aim for ≤1/8″ in 10′ and ≤1/16″ in 2′). Accessories like prefab niches, benches, and curbs integrate cleanly, and a compatible bonding-flange drain ties the pan into the same continuous surface assembly. Careful detailing at corners, penetrations, and curbs is what keeps the system watertight and under warranty.
Quick guidance
- Follow manufacturer screw spacing; set washers flush and band every fastener head after fastening.
- Tape/band all seams and inside/outside corners; seal penetrations (valves, pipes) with system gaskets or approved sealant.
- Keep planes co-planar for large-format tile; shim or plane studs before panel install to hit flatness targets.
- Complete drain integration and cure all banded seams, then perform a documented flood test before setting tile.
Drain integration, slope, and weeps
A waterproofing system is only as reliable as its drain connection. Surface-applied membranes pair best with bonding-flange drains that embed the membrane directly onto the flange for a continuous seal. Traditional clamping drains can work too, but only with a true pre-slope mortar bed and open weep paths so water can escape the setting bed. Verify slope at 1/4″ per foot before membranes cure, keep planes smooth to the drain, and don’t pack thinset or sealant into weep channels.
Linear drains simplify single-plane slopes and large-format tile layouts, while point drains require even fall from all sides. For liquids, the divot method around a clamping drain preserves membrane continuity without blocking the weeps. Set drain height for finished tile plus thinset, embed the membrane to the flange per the brand’s instructions, and flood test after full cure.
Do this every time
- Match the drain to the membrane approach: bonding-flange for surface systems; clamping drain with pre-slope for traditional or divot installs.
- Maintain a 1/4″ per foot slope to the drain and check with a long level to eliminate birdbaths.
- Keep weep holes open on clamping drains using pea gravel or weep protectors; never bury or caulk over weep channels.
- Flood test after full cure, record the water line, and photo-document the duration before setting tile.
Thickness, cure windows, and flood tests
Sheet membranes succeed on proper overlaps and a solid thinset bond. Liquids succeed on verified wet-film thickness applied in multiple coats. Foam-board systems succeed on fully banded seams and sealed fastener heads. No matter the approach, curing is not optional and neither is a flood test. Let the assembly reach the manufacturer’s cure window, then plug the drain, mark the water line, and hold the test for the full duration specified. A passed test is cheap insurance against mold, efflorescence, and callbacks.
Pre-test checklist
- Substrate flat, seams sealed, penetrations and inside/outside corners detailed per the data sheet
- Drain integrated to the chosen system; slope checked at 1/4″ per foot with no birdbaths
- For liquids, target mil thickness verified with a wet film gauge across all planes
- Cure window observed based on temperature and humidity; provide ventilation but avoid forced heat
- Pan protected from foot traffic; curb and lower wall banding intact
- Test plug placed in the riser below the drain grate so the pan can fill
Running the test
- Fill the pan to just below the top of the curb; avoid splashing fresh wall seams
- Mark the water line with painter’s tape and a pencil; photograph the start time and level
- Hold the test for the full brand-specified duration (often 24 hours) without topping up
- Recheck and photograph the water line at the end of the test
Pass/fail criteria
- No measurable drop in water level, excluding minor evaporation in hot, dry rooms
- No damp spots at ceilings or walls below, and no darkening around seams or the curb
- Weep paths unblocked on clamping drains; no thinset or sealant intruding into channels
- If any leak appears, drain the pan, dry thoroughly, repair the detail, and repeat the test
After the flood test
- Drain completely and let the assembly dry per the data sheet before setting tile
- Reconfirm slope, plane the setting surface if needed, and protect the pan during wall work
- Keep a photo log of the test for inspections and warranty documentation
Substrates, vapor, and ventilation
Not every backer is approved by every system. Cement board is the safest default for most standard showers; some sheet membranes allow drywall in non-steam applications; foam backer boards are inherently waterproof and speed wall prep. Whatever you choose, keep walls flat and plumb so the membrane bonds uniformly and large-format tile lays cleanly. In colder regions like Terre Haute, controlling vapor is just as important as liquid water: surface-applied membranes keep moisture at the tile plane, but you still need the right vapor strategy and reliable mechanical ventilation.
Approved substrates and prep
- Verify the manufacturer’s approved substrates; don’t assume cross-compatibility between brands
- Hit flatness targets before waterproofing (≤1/8″ in 10′ and ≤1/16″ in 2′ for large tile)
- Clean, dry, dust-free surfaces; correct soft spots and high ridges before membrane goes on
- Treat penetrations, niches, and window returns as critical details, not afterthoughts
Vapor management (standard vs steam)
- Standard showers: use a surface-applied membrane and avoid a second vapor retarder behind the wall (no poly behind a surface membrane)
- Steam showers: choose a steam-rated membrane per the data sheet and local code; detail ceilings, corners, and penetrations with the same system
- Place any required vapor retarder on the warm-in-winter side and keep the assembly consistent across all planes
- Coordinate backer choice, adhesive, and membrane so the whole assembly meets the required vapor performance
Ventilation checklist
- Size the fan by room volume and code minimums; 1 CFM per square foot (50 CFM minimum) is a practical baseline
- Use smooth or rigid duct, keep runs short with gentle bends, and insulate in cold zones to prevent condensation
- Terminate outdoors through a proper exterior cap; never vent into the attic or soffit
- Add a timer or humidity control (20–30 minutes post-shower) so the fan actually clears moisture
Which system should you choose?
There isn’t a single winner, each waterproofing approach fits different bathrooms, layouts, and budgets. For standard alcoves with clean corners and a linear drain, a sheet membrane kit delivers predictable seams, straightforward bonding-flange drain integration, and an easy flood test. If you’re building benches and niches or shaping arches and curves, a liquid waterproofing membrane simplifies detailing while creating a monolithic, tile-ready surface. For fast remodels or large-format tile, foam backer boards produce flat, plumb planes quickly; just band every seam and fastener and pair with a compatible drain. In Terre Haute and similar freeze–thaw climates, follow cure windows closely and document the flood test to lock in long-term performance and warranty coverage.
Quick decision guide
- Sheet membrane for standard alcoves, linear drains, tidy corners, and highly inspectable overlaps
- Liquid membrane for niches, benches, radius details, and irregular layouts where fewer seams help
- Foam boards for speed, flat walls, and large-format tile alignment on tight schedules
- Steam showers require a vapor-rated system and consistent detailing across walls, ceiling, curb, and penetrations
Hybrid combinations that work
- Foam boards on walls with a liquid-applied pan and divot around a clamping drain (keep weeps open)
- Sheet membrane pan with liquid detailing at the niche, bench, and valve penetrations (stay within brand-compatibility rules)
Extra factors to weigh before you buy
- Drain type: bonding-flange for surface systems; clamping drains need a true pre-slope and protected weep holes
- Timeline and temperature: liquids depend on verified wet mils and cure windows; sheets reward flat substrates and firm seam rolling
- Tile format and layout: large-format panels prefer flat foam walls; mosaics are forgiving but reveal low spots in the pan
- Warranty and inspections: stick to the brand’s approved substrates, accessories, and flood-test duration; keep photos and notes for your records
Cost ranges (materials only, typical 3×5 alcove)
| Component | Typical range |
|---|---|
| Sheet membrane kit + drain | ~$400–$900 |
| Liquid membrane + fabric | ~$150–$350 |
| Foam-board wall kit + bands | ~$800–$1,300 |
Our shower standards (Patriot Property Pros)
We build tile showers for longevity, inspection clarity, and quiet maintenance. Every assembly is surface-applied, flood-tested, and documented. Drains are matched to the chosen membrane, planes are kept flat for large-format tile, and cure windows are respected before testing or setting. Corners, curbs, niches, and penetrations are detailed with brand-approved accessories or fabric, and ventilation is sized and ducted outdoors so humidity doesn’t linger in the assembly. In Terre Haute’s freeze–thaw climate, this process reduces movement, mold risk, and callbacks.
Please take time to take a look at our bathroom renovation page.
What we commit to
- Brand-approved substrates and compatible bonding-flange or clamping drains
- Verified thickness on liquids with a wet film gauge; inspected seams on sheets and foam
- Documented flood tests before tile or grout touches the pan
- Clean, continuous transitions at curb, niche, bench, window returns, and valve penetrations
Installation checkpoints we follow
- Flatness targets met before waterproofing (≤1/8″ in 10′ and ≤1/16″ in 2′)
- Slope to drain at 1/4″ per foot with no birdbaths
- Seams overlapped or banded per the data sheet; fastener heads sealed on foam
- Cure windows observed by temperature and humidity; test only after full cure
What you receive from us
- Photo log of prep, membrane coverage, and the full flood test window
- Product list of membranes, drain components, sealants, and accessories used
- Care notes for ventilation run time after showers and grout/caulk maintenance
- Warranty terms with guidance on future add-ons that keep the system compatible
Ready for a leak-proof, long-lasting shower?
We’ll recommend the right system for your space, integrate the proper drain, and flood test the pan so you get a dry, durable shower installation in Terre Haute, Indiana.
Serving Terre Haute, Clinton, Rockville, and surrounding areas.