Basement Wall Insulation Methods (Foam Board vs Spray Foam vs Fiberglass)
Basements feel cold and damp because concrete moves heat and moisture. In Terre Haute and West-Central Indiana, the fix is a moisture-smart wall assembly: continuous foam at the foundation, airtight rim-joists, and a smart interior vapor retarder.
Quick Answer For Indiana Homes
If you just need the TL;DR for our mixed-humid climate:
- Use rigid foam board or closed-cell spray foam directly on concrete to create a continuous thermal break and control condensation
- Only use fiberglass after you’ve added that foam thermal break; never place batts against bare concrete
- Seal rim-joists aggressively and insulate to high R (spray foam 3–4 in is common) to stop drafts and moisture
- Skip polyethylene on concrete; use a smart interior vapor retarder (Class II/III) so the wall can dry seasonally
Note: Aim for roughly 1–2 in of continuous foam on walls and an effective R-15–R-20 overall; keep indoor RH near 40–50%.
Why Basements Get Cold And Musty
Concrete is below grade and stays cool year-round. Warm indoor air holds moisture; when that air meets a cold concrete surface, it drops water at the dew point, often inside wall cavities where you can’t see it. Add a few hidden air leaks at the rim-joist and utility penetrations, and you’ve built a steady moisture source that feeds mold and musty odors.
The fix is sequencing. First, warm the interior surface of the foundation with a continuous foam layer so humid air never “sees” cold concrete. Then add your service wall, wiring, and finishes. Done in this order, the assembly controls temperature and vapor at the same time, which keeps the basement comfortable and protects drywall, flooring, and trim. Insulation is a major part of basement remodeling and has to be installed correctly.
Key failure points to watch for:
- Batts placed directly on concrete (cold surface + fibers = mold risk)
- Unsealed rim-joists and sill plates that leak outdoor air into cavities
- Polyethylene against concrete that traps moisture rather than letting it dry
- Thermal bridging through studs when there’s no continuous foam layer
Basement Insulation Methods Compared (At-a-Glance)
Use this quick chart to see how each insulation type handles R-value, vapor, and air sealing before you pick a wall assembly. See our guide to drywall vs drop ceilings in basements.
| Method | R per inch (approx) | Vapor behavior | Air sealing | Best use | Watch-outs |
|---|---|---|---|---|---|
| EPS (Type II) | ~4.2 | More vapor-open at thickness | Needs taped seams | Continuous foam on concrete with service wall | Use foam-safe adhesive; seal slab/rim edges |
| XPS | ~5.0 | Moderately vapor-closed | Needs taped seams | Continuous foam on concrete where durability helps | Detail corners/penetrations carefully |
| Foil-faced Polyiso | ~6.0 (interior-moderated) | Very low perm | Needs taped foil seams | Interior layer or over studs to boost R | Plan electrical box depth/clearances |
| Closed-cell Spray Foam | ~6–7 | Low perm (vapor-controlling) | Excellent (single layer) | Wavy/utility-heavy walls; rim-joists | Requires ignition/thermal barrier, pro install |
| Mineral Wool (with foam) | Batt rating (e.g., R-13) | Vapor-open | Depends on foam layer | In stud wall over continuous foam | Don’t rely on batts for air seal |
| Fiberglass (with foam) | Batt rating (e.g., R-13) | Vapor-open | Depends on foam layer | Budget cavity fill over foam | Never against bare concrete; use smart retarder |
Option 1: Rigid Foam Board On Concrete
Rigid foam creates a continuous thermal layer that warms the interior surface of the foundation wall and cuts condensation risk. It’s the simplest way to get a true thermal break before you frame and finish.
Foam type quick picks (what to use where)
- EPS (Type II): ~R-4.2/in; more vapor-open at thickness; cost-effective and stable
- XPS: ~R-5/in; moderately vapor-closed; rugged edges for tight seams
- Foil-faced Polyiso: ~R-6/in (interior-moderated temps); very low perm; excellent as an interior layer
- GPS (graphite EPS): ~R-4.7–5/in; EPS behavior with a small R-value boost
Installation sequence (clean, continuous, service-friendly)
- Prep: Clean and spot-level concrete; scrape bumps; vacuum dust; address active moisture first
- Adhere: Use foam-safe adhesive (no solvents) or approved mechanical fasteners on irregular walls
- Seal: Tape all seams; spray foam or caulk perimeters where foam meets slab and rim/sill
- Frame: Set a PT bottom plate with sill gasket, then a 2×4 wall ½–¾ in off the foam for wiring
- Optional R boost: Add unfaced mineral wool or fiberglass in studs (no faced batts)
- Finish safely: Smart vapor retarder on the interior, then drywall as the ignition/thermal barrier
Detailing that prevents callbacks
- Irregular walls: Kerf-cut or shim foam; keep the air barrier unbroken at corners and around penetrations
- Slab edge: Seal the foam-to-slab joint; use a capillary break under the PT plate (gasket or sealant)
- Termites/inspection: If local practice prefers a visible gap, leave a thin inspection strip at the top and carry the air barrier with taped sheathing above
- Adhesive compatibility: Use foam-rated construction adhesive; avoid solvent-based products that melt foam
Performance targets for Indiana basements
- Thickness: 1–2 in continuous foam to hold the dew point within insulation, not on concrete
- Effective R: R-15–R-20 wall assemblies after you add the service wall insulation
- Airtightness: Treat foam as your primary air barrier; continuity at rim/sill is critical
- Indoor RH: Maintain ~40–50% with dehumidification during first summer after finishing
Pros
- True continuous thermal break that tames condensation
- Predictable moisture behavior with simple materials
- Easy to service—wiring/plumbing in the stud cavity
- Scales R-value affordably by combining foam + cavity insulation
Cons
- Requires meticulous seam/perimeter sealing to perform
- Loses a small amount of floor area to foam + service wall
- Uneven foundations may need more prep/shimming
- Foil-faced layers demand careful electrical box planning
Typical installed cost (Indiana)
- 1–2 in EPS/XPS on walls, taped/sealed: $3.50–$6.50 per sq ft
- Add 2×4 service wall + interior finishes: +$2.50–$4.50 per sq ft
Rule of thumb: If you can’t commit to airtight, taped foam with sealed edges, you won’t get the condensation control you’re paying for—fix air sealing first, then add R.
Option 2: Closed-Cell Spray Foam On Concrete
Closed-cell spray foam shines when foundation walls are uneven, penetrations are plentiful, or you want the tightest air seal possible. Sprayed directly to concrete, it delivers insulation and low-perm vapor control in a single layer, which is why it’s a top pick for older basements that feel drafty. In Indiana, 1.5–2 inches on the walls typically balances cost and performance; at rim-joists, 3–4 inches closes down the biggest comfort leak in the envelope.
You’ll still finish with a code-approved ignition or thermal barrier, most commonly drywall. Many projects add a shallow service cavity (1×3 or 2×2 furring) so future wiring changes don’t disturb the foam. Prepping the substrate, managing humidity, and sequencing trades are what make spray foam perform like the premium you’re paying for.
When to choose spray foam
- Irregular or rubble foundations where boards won’t sit flat
- Heavy utility zones with lots of penetrations around the rim-joist
- Remodels that need maximum air sealing and minimal wall thickness
- Situations where you want both insulation and vapor control in one step
Installation sequence that avoids callbacks
- Prep the concrete: scrape loose paint, vacuum dust, and address active water issues
- Mask thoroughly: floors, windows, mechanicals, and any finished areas near the spray zone
- Condition the space: keep substrate and air in the manufacturer’s temperature range and control RH
- Spray in lifts: build to 1.5–2 in on walls, 3–4 in at rim-joists; avoid overspray on fixtures
- Inspect and touch up: fill thin spots, tie into sill/rim air barrier continuously
- Add protection: install the ignition/thermal barrier (drywall) and an optional shallow service cavity
Performance targets for Indiana basements
- Wall thickness: 1.5–2 in (roughly R-10–R-14)
- Rim-joist thickness: 3–4 in (roughly R-20–R-28)
- Air barrier continuity: tie foam into the sill plate, top plate, and adjacent assemblies
- Indoor humidity: maintain ~40–50% RH, especially during first summer after finishing
Pros
- Powerful air sealing on wavy, cracked, or penetrated walls
- High R per inch keeps wall thickness down in tight basements
- Low permeability helps control condensation at the concrete
- Excellent at rim-joists where leaks and cold spots are common
Cons
- Higher upfront cost than rigid foam with a service wall
- Pro-only install; requires site conditioning and strict safety
- Harder to modify later without cutting back foam
- Overspray and odor management require good masking and ventilation
Inspector and code notes
- Plan the ignition/thermal barrier (typically ½ in drywall) during layout
- Keep shutoffs, cleanouts, and junction boxes accessible and clearly marked
- Verify foam meets local fire and smoke ratings for interior use
- Coordinate termite or inspection gaps if your jurisdiction requires them
Typical installed ranges for spray foam (Indiana)
- Walls at ~2 in: $5.50–$9.00 per sq ft
- Rim-joists at 3–4 in: $9.00–$14.00 per linear ft
Rule of thumb: spray foam earns its premium only when it’s continuous and well-detailed. If you can’t maintain surface prep, temperature, humidity, and a proper thermal barrier, you won’t get the condensation control you’re paying for.
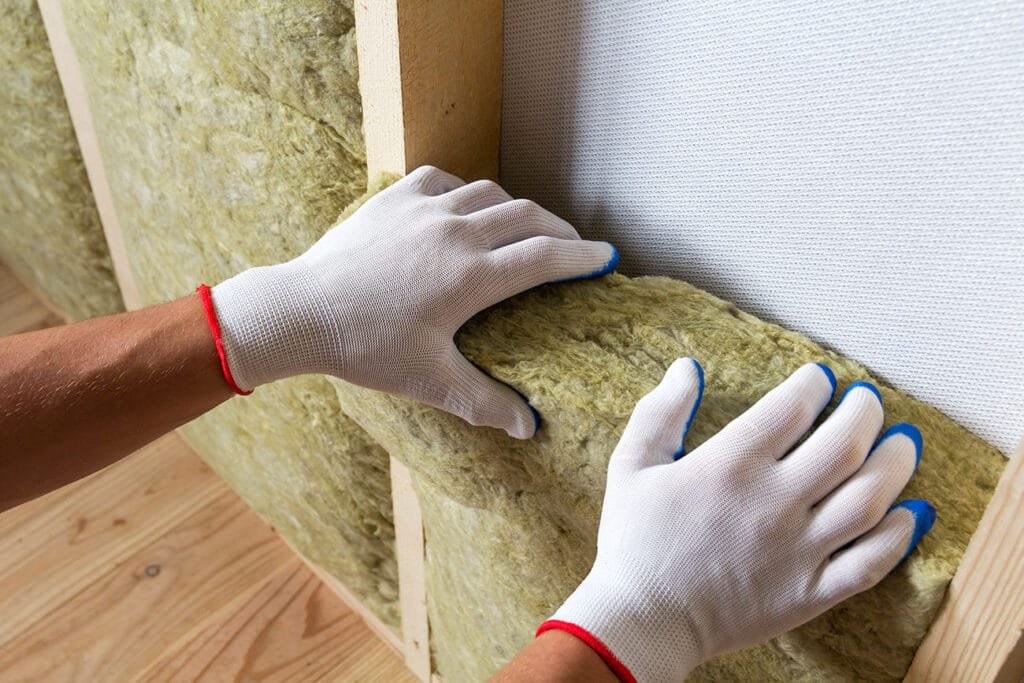
Option 3: Fiberglass Batts With A Foam Thermal Break
Batts are budget-friendly and easy to work with, but they only perform in a basement if you first warm the interior surface of the foundation with a continuous rigid foam layer. Without that foam, the concrete stays cold, indoor air finds it, and condensation grows behind the batts. The hybrid approach—thin rigid foam on concrete plus batts in a service wall, balances cost, comfort, and moisture safety for many Terre Haute basements.
When to choose fiberglass insulation
- You want lower material cost than full spray foam without sacrificing moisture control
- Your walls are fairly straight so boards can sit flat and seams can tape cleanly
- You prefer a conventional 2×4 service wall for wiring, plumbing, and future changes
- You’re willing to be meticulous about sealing seams, edges, and penetrations
Assembly recipe (clean, continuous, and service-friendly)
- Prep the concrete: scrape bumps, vacuum dust, fix active water intrusions
- Bond 1 in EPS or XPS to concrete with foam-safe adhesive or approved fasteners
- Tape all seams and seal perimeters where foam meets the slab and rim/sill
- Frame a 2×4 wall ½–¾ in off the foam; install a gasket under the PT bottom plate
- Add unfaced R-13 mineral wool or fiberglass in the stud bays (no kraft/poly facers)
- Install a smart vapor retarder on the interior, then drywall as the ignition/thermal barrier
Performance targets for Indiana basements
- Foam thickness: 1–1.5 in continuous foam is the minimum for condensation control
- Effective R: plan on R-15–R-20 overall once the cavity insulation is added
- Airtightness: treat the rigid foam layer as the primary air barrier and seal it like one
- Indoor RH: maintain roughly 40–50% with dehumidification during the first summer
Pros
- Lower material cost than full spray foam with moisture-smart performance
- Familiar framing and easy service runs in the stud wall
- Scalable R by combining continuous foam with cavity insulation
- Straightforward to modify later
Cons
- More parts to detail; performance drops fast if seams or edges leak air
- Lower effective R at studs without added thermal-bridge control
- Sensitive to gaps behind batts or sloppy fit at boxes and pipes
- Requires careful planning to keep shutoffs and junction boxes accessible
Typical installed ranges (Indiana)
- 1 in foam on concrete + 2×4 wall with R-13 batts: $4.50–$7.00 per sq ft
Detailing pitfalls to avoid
- Leaving gaps between foam boards or skipping perimeter sealant at slab and rim
- Using faced batts or adding polyethylene on the interior, which traps moisture
- Compressing batts around boxes and pipes instead of trimming for a tight fit
- Bridging the foam with direct-to-concrete furring that bypasses the thermal break
Upgrades and variants
- Use graphite-enhanced EPS (GPS) for a small R bump per inch
- Add ½–1 in interior polyiso over studs before drywall to reduce thermal bridging
- Include a continuous sill gasket and sealant under plates for capillary and air breaks
- Pre-plan wire chase channels or shallow furring so the smart retarder stays intact
Rim-Joist Strategy
The rim-joist is often the coldest, leakiest part of a finished basement because wood-to-wood joints, sill gaps, and utility penetrations create a maze of air paths. Cold exterior air meets warm indoor air here, so condensation and mold can start even when walls are insulated correctly. Treat the rim as its own mini-project: air seal first, then insulate to a high R, and finish with the required protection.
What works best (Indiana basements)
- Closed-cell spray foam at 3–4 in delivers air sealing and ~R-20–R-28 in one step—ideal for stopping drafts and condensation
- Rigid foam inserts (cut-and-fit) with sealed edges plus mineral wool infill can perform well if seams are truly airtight
- Maintain a continuous air barrier by tying the rim treatment into the wall foam and the sill/seal line
Step-by-step (clean, continuous, code-smart)
- Prep and dry: Remove debris, check for staining, rusty fasteners, or active moisture; fix intrusions first
- Air seal: Caulk or foam cracks at the sill plate, band/rim joints, and all penetrations before insulating
- Insulate:
- Best: Closed-cell spray foam 3–4 in, continuous, wrapping corners and joist ends
- Hybrid: Cut rigid foam to fit each bay, seal perimeter with can foam, then add mineral wool inboard
- Protect: Add the required ignition/thermal barrier (typically ½ in drywall or listed coating) and keep access to shutoffs
Performance targets to aim for
- R-value: R-20+ at the rim in mixed-humid climates
- Airtightness: No visible gaps; foam should bridge wood-to-wood joints and penetrate around hangers where allowed
- Continuity: Seal transitions to the wall foam and to the sill gasket/plate so the air barrier isn’t interrupted
- Indoor RH: Hold ~40–50% to minimize seasonal condensation
Common mistakes to avoid
- Stuffing fiberglass alone in rim bays (creates a cold condensing surface behind the batt)
- Skipping perimeter sealing around rigid inserts (tiny leaks undo the assembly)
- Spraying thin, uneven lifts that leave shadows or voids at corners and hangers
- Forgetting ignition barrier requirements or covering shutoffs/cleanouts
Inspector and durability notes
- Plan the ignition/thermal barrier during layout so it doesn’t block valves or junction boxes
- Confirm foam product listings for interior use and flame/smoke ratings; document thicknesses
- If local practice calls for termite inspection gaps, coordinate a narrow visible band and carry the air barrier with taped sheathing above
- Label hidden utilities on the finished surface for serviceability
Rule of thumb: If you can feel a winter draft at the rim-joist, your wall insulation will never reach its potential. Fix the rim first; the basement will feel warmer immediately.
Vapor And Air Control That Works Here
Mixed-humid climates like Vigo County reward assemblies that are airtight and moderately vapor-closed at the concrete, while allowing controlled drying to the interior. Continuous foam against concrete keeps interior surfaces warm. A smart vapor retarder on the interior side of the stud wall supports seasonal drying without encouraging condensation. Keep indoor relative humidity around 40–50 percent and you’ll protect finishes and comfort.
- Avoid polyethylene against concrete
- Favor continuous foam plus interior smart vapor retarder
- Target effective R-15–R-20 on walls and R-20+ at rim-joists
- Pair insulation with dehumidification during the first summer after finishing
Performance Targets for West-Central Indiana
These specs keep interior surfaces warm, control condensation, and align with mixed-humid conditions in Vigo County.
| Item | Target (West-Central Indiana) |
|---|---|
| Continuous foam thickness on walls | 1–2 in (dew-point control) |
| Wall assembly effective R | ~R-15–R-20 |
| Rim-joist insulation | ~R-20–R-28 (3–4 in closed-cell) |
| Primary air barrier | Taped/sealed foam layer tied to sill/rim |
| Interior vapor control | Smart vapor retarder (Class II/III) |
| Indoor relative humidity | ~40–50% (dehumidify first summer) |
Costs And Choices You Can Control
In a mixed-humid zone like Vigo County, you want two things working together: a tight air barrier and a vapor strategy that slows moisture at the concrete while still allowing controlled drying inward. Continuous foam on the foundation warms the interior surface so humid room air never hits a cold condensing plane. On the room side, a smart (variable-perm) vapor retarder over the stud wall lets the assembly dry when seasons flip, without trapping moisture.
Think in layers: the rigid or spray foam is your primary air/vapor control at the concrete; taped seams and sealed perimeters make it continuous. The stud wall is secondary, keep it simple with unfaced insulation, then cover with a smart vapor retarder before drywall. Maintain indoor RH around 40–50% and you protect finishes and comfort year-round.
Typical Cost Ranges in Indiana
Ballpark installed prices to help you budget and compare assemblies before your walkthrough.
| Scope | Typical range |
|---|---|
| 1–2 in EPS/XPS on walls, taped/sealed | $3.50–$6.50 per sq ft |
| Add 2×4 service wall + finishes | +$2.50–$4.50 per sq ft |
| Closed-cell spray foam on walls (~2 in) | $5.50–$9.00 per sq ft |
| Closed-cell spray foam at rim-joists (3–4 in) | $9.00–$14.00 per linear ft |
| Hybrid: 1 in foam + R-13 batts in studs | $4.50–$7.00 per sq ft |
| Premium retrofit: EPS on concrete + interior polyiso over studs | $8.50–$14.00 per sq ft |
Practical checklist (Indiana basements)
- Use continuous foam against concrete as the primary air barrier; tape seams and seal slab and rim/sill edges
- Add a smart interior vapor retarder (variable perm, Class II/III) over the stud wall before drywall
- Target effective R-15–R-20 on walls and R-20+ at rim-joists, with special attention to airtightness at transitions
- Avoid polyethylene against concrete and skip kraft-faced batts in the cavity
- Control indoor humidity to ~40–50% with a dehumidifier and properly ducted bath/HRV/ERV exhaust
- Verify continuity with a quick field check: smoke pencil at plates/penetrations or IR scan on a cold day
Useful rules of thumb
- Class I poly belongs nowhere on the concrete side; keep the “cold side” warm with foam instead
- Variable-perm interiors (~0.5 perm when cold, opening to 10+ perms when warm) support seasonal drying
- The most important seals are at the foam-to-slab joint, foam-to-rim/sill, inside corners, and around penetrations
- Dew point control comes from thickness plus continuity—thin but airtight foam beats thick, leaky foam every time
Recommended Assemblies For West-Central Indiana
Compare the most reliable basement wall assemblies for West-Central Indiana, what they include, when to choose them, and typical installed costs.
| Assembly | Wall insulation | Rim-joist | Service cavity | Why choose it | Typical cost (IN) | Notes |
|---|---|---|---|---|---|---|
| Good | 1–1.5 in EPS/XPS to concrete, taped | Add later per rim detail | 2×4 wall | Simple, reliable, budget-friendly for straight walls | $6.00–$11.00/sq ft (foam + wall + finish) | Seal foam-to-slab and foam-to-rim edges carefully |
| Better | 2 in EPS/XPS to concrete, taped | Add later per rim detail | 2×4 wall w/ mineral wool | Higher effective R and quieter room with modest cost bump | $7.50–$12.50/sq ft | Strong baseline for most Terre Haute basements |
| Best | 2 in closed-cell spray foam on walls | 3–4 in spray foam | Shallow chase | Maximum air sealing on wavy/utility-heavy walls | $9.00–$15.50/sq ft (walls) + $9.00–$14.00/lf (rim) | Plan ignition/thermal barrier and a small service chase |
| Premium retrofit | 1.5 in EPS on concrete + 1 in interior polyiso over studs | 3–4 in spray foam | 2×4 wall | Excellent stud thermal break, very low vapor drive | $8.50–$14.00/sq ft | Coordinate box depths and trim; comfort-first choice |
Rule of thumb: pick the simplest assembly that achieves airtight, continuous foam at the concrete and R-20+ at the rim-joist; performance lives or dies at the seams and transitions.
Frequently Asked Questions On Basement Insulation In Indiana
Do I need a vapor barrier on basement walls in Indiana?
Use continuous rigid foam (or closed-cell spray foam) against the concrete and a smart interior vapor retarder over the studs. Skip polyethylene on concrete to avoid trapping moisture.
How thick should the foam be on basement walls?
In West-Central Indiana, 1–2 inches of continuous foam typically keeps the dew point within the insulation instead of on the concrete. Add cavity insulation to reach ~R-15–R-20.
Will spray foam make my basement too “tight”?
No, not if you manage ventilation and humidity. Aim for 40–50% RH, vent bath fans outdoors, and consider a dehumidifier the first summer after finishing.
How much does basement wall insulation cost in Indiana?
Rigid foam plus a service wall often lands around $6.00–$11.00 per sq ft installed. Closed-cell spray foam walls run about $9.00–$15.50 per sq ft (walls), with rim-joists $9.00–$14.00 per linear ft.
Can I put fiberglass batts directly on foundation walls?
No. Always install a continuous foam thermal break first. Batts against bare concrete invite condensation and mold.
What’s the best way to insulate the rim-joist?
Closed-cell spray foam at 3–4 inches provides air sealing and ~R-20–R-28. A cut-and-fit rigid insert with sealed edges plus mineral wool can work if seams are truly airtight.
Do I need an ignition or thermal barrier over foam?
Yes. Interior foam typically requires a code-approved barrier like ½-inch drywall or a listed coating. Plan this during layout so you don’t block valves or junction boxes.
Which assembly should I choose for a wavy or utility-heavy foundation?
Go “Best”: closed-cell spray foam on walls and 3–4 inches at the rim-joist, plus a shallow service chase. It delivers top-tier air sealing and keeps wall thickness down.
Need further assistance?
Unsure about something? Get in touch with us for a personalized consultation.
Ready For A Warm, Dry Basement?
Turn your basement into comfortable living space with a moisture-smart insulation plan. Call 765-505-8383 or request your free in-home estimate. We serve Terre Haute and West-Central Indiana and can align insulation with ceilings, lighting, and subfloors for a clean finish.
Serving Terre Haute, Clinton, Rockville, and surrounding areas.