Sump Pumps & Battery Backup for Indiana Basements (Quiet, Reliable, Code-Clean)
A dry, quiet basement starts with handling groundwater and hydrostatic pressure. In many Terre Haute homes, that means a properly installed sump pump with a sealed basin and a battery backup for storm outages. This in-depth guide explains how to choose the right pump, size a backup that actually runs long enough, and route a discharge that won’t freeze.
Quick Answer
If you see water along the slab edge after storms, a cast-iron ⅓–½ HP sump pump in a sealed basin, paired with a quiet check valve and a battery backup, is the dependable fix for Indiana basements. Size the backup battery for several cycles per hour over 6–24 hours, pitch the discharge to daylight with freeze protection, and place the pump on a dedicated circuit with an alarm. Typical installed costs in Terre Haute: $1,100–$2,400 for a new sealed basin and primary pump, with $1,200–$2,400 for a quality battery backup kit.
Do You Need a Sump in Terre Haute?
Not every “wet basement” needs a pump. In West-Central Indiana, two issues get mistaken for each other: seepage from hydrostatic pressure and simple condensation. Seepage shows up when groundwater rises during storms and pushes in at the cove joint (where wall meets slab) or along the slab edge; condensation appears when humid summer air hits cool concrete and sweats, even on dry days.
If you see a damp ring after rain, weeping at the cove joint, or an existing pit that cycles during storms, you’re dealing with groundwater. The right fix is interior water management: an interior French drain tied to a sealed sump basin with a correctly sized sump pump. If surfaces only feel clammy during hot, humid weather with no rain pattern, start with ventilation and a dehumidifier; target ~50% relative humidity before you cut concrete.
A quick way to tell the difference is the foil test. Tape a square of foil to the wall or slab: moisture behind the foil indicates seepage through the concrete; moisture on the room side points to airborne humidity. Pair that with a simple observation of timing—after storms versus on muggy afternoons—and you’ll know whether to pursue basement waterproofing with a perimeter drain and pump or focus on airflow, gutters/grade, and humidity control.
Quick checks
- Damp ring or active weep at the cove joint after rain = hydrostatic pressure
- Pit runs during storms or rises with long soaks = groundwater, not humidity
- Foil test: wet behind foil = seepage; wet on room side = condensation
- Only muggy-day clamminess with no rain pattern = ventilation/dehumidifier first
Primary Pump Basics
A dependable, quiet sump starts with the right construction and sizing. Cast-iron or cast-aluminum housings shed heat and last longer than all-plastic bodies, which helps the motor run cooler on long, storm-day duty cycles. For most Terre Haute basements, a ⅓–½ HP pump matched to your basin and head height moves plenty of water without “short-cycling.” Look beyond horsepower and check the curve: gallons per hour (GPH) at your actual lift, and the shutoff head. Oversizing can make the float click on/off every few seconds, which is noisy and hard on components.
Switching and plumbing details matter just as much. A vertical float switch (or solid-state level sensor) is more reliable in narrow pits than a tethered float. Place a quiet, spring-loaded check valve in the correct orientation on a straight vertical run to prevent water hammer, and drill the manufacturer-specified air-relief (weep) hole to avoid air-lock. Use Schedule 40 PVC with a service union near the pit so the pump can be pulled in minutes, and keep the discharge diameter per spec (often 1½” or 2″) so you don’t choke flow. Power the pump on a dedicated circuit, add a high-water alarm (audible, and Wi-Fi if you want alerts), and set the float for a slightly deeper drawdown so the unit runs fewer, longer cycles and quieter operation with less wear.
Battery Backup Systems
Storms that raise groundwater also knock out power, so a battery backup covers the exact failure that floods basements. Size it by real cycles, not brochure GPH: watch your pit during heavy rain, estimate cycles per hour, and match a DC backup pump and amp-hour capacity to sustain that load for 6–24 hours at your head height.
Size it right
- Measure cycles per hour during a storm, not on a dry day
- Estimate gallons per cycle from your basin depth and run time
- Check the backup pump curve at your lift (8–10 ft is common)
- Convert your runtime goal into amp-hours; consider dual batteries for long outages
What to look for
- DC backup pump with vertical or solid-state sensor, compatible with your pit
- Smart charger with float mode and clear status indicators
- Alarm with optional Wi-Fi/text alerts so you know before water reaches the lid
- Clean plumbing: correct check-valve orientation and a service union for testing
Cold weather and maintenance
- Add a freeze guard on the exterior discharge to bypass ice plugs
- Test monthly by lifting the sensor; verify actual flow at your head height
- Inspect terminals, keep the charger in float, and replace AGM batteries on schedule
- Log storm behavior (cycles per hour, run time, alarms) so future sizing is based on your home’s data
Discharge and Freeze Protection
A reliable sump system depends on a clean, code-friendly discharge. Keep the run short, straight, and sloped so water leaves the house quickly without cycling back. Schedule 40 PVC with the manufacturer-sized diameter (often 1½–2″) prevents choking the pump, and a service union near the pit makes pull-and-test simple. Set the check valve vertically, confirm arrow orientation, and drill the air-relief hole if the pump spec calls for it to prevent air-lock. Penetrate the wall once, seal that sleeve airtight to stop drafts and pests, then carry the line to daylight or an approved storm route. Never into sanitary without an approved backflow method. Terminate away from foundations, walks, and neighbors’ properties, and control splash and erosion with stone or a diffuser.
Winter is the failure season in Indiana, so design for freeze protection. Outside, add a freeze-guard or bypass fitting so if the outlet ices up, discharge still escapes instead of returning to the pit. Maintain continuous fall, avoid low sags that hold ice, and keep the last few feet high-drain (no unvented traps). Where outlets sit in wind or shade, a removable extension and diffuser make seasonal service easy; in rare trouble spots, insulated sleeves or heat-trace (on a GFCI) can help. Finish with grading that sends water to a safe daylight point, and keep the outlet screen clear of mulch and leaves.
Quick checks
- Continuous slope to daylight; no bellies, no uphill runs
- Correct check-valve orientation and a nearby union for service
- Airtight, sealed wall sleeve; outlet set clear of walks and foundation
- Freeze-guard/bypass at the exterior termination; diffuser or stone to prevent erosion
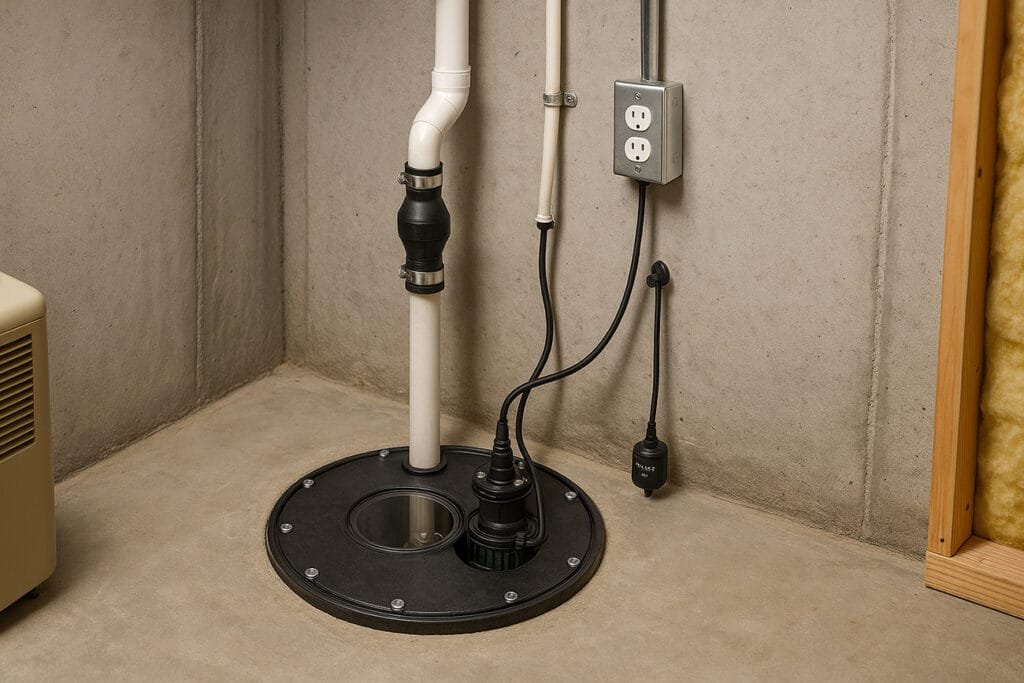
Sealed Lids, Odor, and Radon
A sealed, gasketed sump lid is standard in finished basements. It limits humidity and odors from the pit, dampens pump noise, and helps with radon control. Power cords and the discharge should pass through tight grommets so the cover stays gas-tight after service, and bolt-down fasteners make removal and re-sealing repeatable.
Why the sealed lid matters
- Controls humidity and basement odors from the pit
- Acts as a radon/vapor barrier at the slab opening
- Reduces pump noise escaping into living areas
- Looks finished and passes common inspection expectations
Spec checklist
- Gasketed, bolt-down lid sized to your basin ring
- Cord and discharge grommets that clamp tightly after service
- Small service/inspection port so you can test floats without removing the lid
- Quiet check valve on the vertical discharge to prevent water hammer
- Perimeter seal to the slab (keep it removable with screws, not permanent adhesive)
- Labeled, dedicated circuit and a high-water alarm lead routed through a sealed fitting
Radon-friendly details
- Treat the lid as part of the sub-slab air barrier; seal lid-to-flange and flange-to-slab
- Use compression grommets for cables/pipes so the cover stays gas-tight after maintenance
- If tying into radon mitigation, use a lid adapter or separate suction point; don’t connect the sump to DWV plumbing
Noise tips near living areas
- Decouple the discharge where it passes through the lid with a rubber boot to limit vibration
- Strap the vertical line securely so it doesn’t rattle against framing
- Add mineral wool in the adjacent wall cavity if the pit is beside a family room
Local inspection notes (Vigo County)
Inspectors commonly look for a sealed lid in finished spaces, accessible fasteners, correct check-valve orientation, a sealed wall penetration, and an audible alarm. Test the pump and alarm at turnover and note the discharge route for your records.
Noise Reduction Without Overbuilding
Mechanical noise rides through framing as vibration, so aim for isolation and controlled flow rather than brute-force mass. A quiet sump setup comes from small details: decoupling the pump and piping, preventing rattles, and softening the “thunk” at shutoff. If the pit sits near a living area, treat the nearby wall like a light acoustic assembly. Enough to dull pump tones without blocking access.
Quick wins
- Rubber isolation where it counts: pads under the basin flange or bracket, and flexible couplers on the discharge to break rigid contact
- Secure, spaced strapping: keep the vertical PVC from tapping studs or joists; avoid tight 90° turns that transmit vibration
- Quiet check valve: spring-loaded design to reduce water hammer at shutoff; install vertically with correct orientation
- Airtight lid fit: a gasketed, bolt-down cover cuts airborne motor noise and focuses on vibration control instead of overbuilding
Placement tips
- Keep the first 3–4 feet of discharge straight and vertical before any elbows; add a union near the pit for fast pull-and-test
- Use a rubber boot or grommet where the pipe passes through the lid to limit resonance and framing buzz
- If the pit shares a wall with a family room, add mineral wool in that wall bay and line a small, removable service panel rather than enclosing the whole area
When to step up treatment (3)
- Persistent “thunk” after cycles → verify check-valve type and orientation, then consider a quieter valve model
- Rattle or buzz at specific RPMs → add or re-space pipe straps and insert isolation pads at contact points
- Audible rush through hard corners → soften the path with two 45°s instead of a single tight 90°, and verify flow at your head height
Permits, Inspection Notes, and Local Tips
In Vigo County, sump systems are reviewed under the Indiana Residential/Plumbing Code. Most projects are straightforward, but inspectors will want to see a safe electrical supply, code-clean discharge routing, and a sealed building envelope where the pipe exits. If the basement is finished, expect added attention to sealed lids and an audible high-water alarm. Plan a quick test at turnover, primary pump, battery backup, and alarm, so the inspection and handoff are smooth.
What inspectors commonly verify
- Dedicated electrical supply sized for the pump, properly grounded receptacle, neat cord management
- Check valve installed in the correct orientation on a vertical run and an air-relief (weep) hole if required by the manufacturer
- Schedule 40 PVC sized per spec, with a sealed wall sleeve/penetration and secure strapping
- Discharge routed to daylight or an approved storm path (no illicit tie-ins to sanitary), with continuous slope
- Sealed, gasketed lid in finished spaces and an accessible means to service floats and pumps
- High-water alarm present and functional; backup system test noted in your documentation
Local tips for Terre Haute homeowners
- Call 811 before digging any exterior discharge or daylight extensions; confirm utilities and frost depth clearances
- Add a freeze guard/bypass at the exterior termination and keep the last feet sloped so winter ice can’t backflow to the pit
- Photograph the discharge route, label the breaker, and keep a simple as-built sketch, helpful for future service and for buyers
- If you have or plan radon mitigation, treat the sump lid as part of the sub-slab air barrier: sealed lid-to-flange and sealed grommets around cords and pipe
This approach satisfies code, avoids freeze and backflow headaches, and gives you a documented system that’s easy to maintain and easy to sell with.
Cost and Timeline in Terre Haute
Here are typical local ranges; site access, electrical distance, and discharge routing move numbers up or down.
| Scope | Typical range | Notes |
|---|---|---|
| Primary sump pump replacement | $650–$1,200 | Quality ⅓–½ HP, quiet check valve, tune and test |
| New basin + primary pump (sealed lid) | $1,100–$2,400 | Cut, set basin, plumbing, sealed lid, patching |
| Battery backup kit (installed) | $1,200–$2,400 | DC pump, battery, charger/controller, alarm |
| Exterior discharge adjustments | $250–$900 | Extensions to daylight, freeze guard, grading tweaks |
Typical timeline
| Phase | Typical duration | What happens |
|---|---|---|
| Cut/set/plumbing | ~½–1 day | Basin set, pump plumbed, check valve fitted |
| Electrical/discharge/lid | ~½–1 day | Dedicated circuit, exterior run, sealed lid, testing |
Most single-basin installs finish inside one to two working days once materials are on site: day one for cut, set, and plumbing; day two for electrical touch-ups, discharge completion, lid sealing, and testing. Add time if you’re tying in an interior perimeter drain or running a long discharge to a better outlet.
Simple Maintenance Plan
A few quick checks each season keep a sump system quiet and reliable. Focus on confirming the pump actually moves water at your head height, the check valve closes smoothly, and the backup is ready for a storm-day outage. Keep notes so future sizing and service are based on your home’s real behavior.
Seasonal checklist
- Run a test cycle: add water or lift the float switch and watch the pit draw down; listen for air-lock and verify the weep hole is clear.
- Check the check valve: confirm smooth close with no “thunk,” no leaks at unions, and secure pipe straps.
- Inspect the discharge outlet: make sure it’s clear of mulch, leaves, and snow; verify continuous slope and that the freeze guard/bypass is unobstructed.
- Backup system health: confirm charger status lights, test the DC pump by tripping its sensor, and review runtime estimates; replace AGM batteries on the manufacturer’s schedule.
- Alarm and power: press the alarm test, label the breaker, and confirm the receptacle or GFCI hasn’t tripped.
- Clean the pit: remove sediment and debris that could jam the float; check cord grommets and lid fasteners for a tight seal.
Annual extras
- Inspect exterior discharge and grading after winter; re-set any settled extensions to maintain pitch to daylight.
- Log storm behavior: note cycles per hour during heavy rain and any alarms; this data guides future battery sizing.
- Review nearby finishes: if you remodeled or added walls, keep an access path and update your as-built sketch for service.
Frequently Asked Questions
Ready for a cleaner, longer-lasting exterior?
Get a quiet, reliable sump system sized for your home. We’ll check head height and cycles, spec the right cast-iron pump, install a sealed lid with a quiet check valve, route the discharge to daylight with freeze protection, and test the battery backup and alarm before we leave.
Serving Terre Haute, Clinton, Rockville, and surrounding areas.